Friday, June 04, 2010

Selection Pane In PowerPoint

Naming Objects
It's good practice for a developer to 'name' all your objects. When creating a PowerPoint presentation i make no exception. Every object i use in my presentation gets named. Why would you want to do that one might ask. Well when developing a complex presentation with a lot of objects in one slide stacked on top of each other it's very hard to select the object you might want to edit. Using the selection pane makes this an easy task.

The selection pane in PowerPoint
When i first met the selection pane in PowerPoint i couldn't help thinking that it looked a lot like something a had seen before in Photoshop. What is the 'eye' for? Could it be that you can temporarily hide objects? Yes it is. Well that makes life easy. Could it also be possible to name your objects so you can select a certain object by clicking on its name? Yes this is also possible... Wow that can save me hours of clicking the wrong object before i actually select the one i need.

Show me...
Ok let's start a simple slide in powerpoint. I've added three objects on this slide. It looks something like this:


Now we will go to the selection pane. By default you don't see this selectionpane so you have to activate it. Go to the [Home] tab in the ribbon. All the way at the right side of the ribbon you'll see the [group] - [editing]. Click on the arrow to see the various options and choose select. In the dropdown choice choose the option [Selection Pane]


If done correctly you'll see the selection pane appear on the right side of your screen. For this example it means that you will see three objects in the selection pane. Depending on what you have chosen the objects will get deafult names with a numbering. Now we are going to adjust this.
Click on one of the objects in the slide (leave the selection pane open). When clicked the object in the selectionpane will get selected. Now either click once in the selected object in the selectionpane and rename the object to something more explanatory then TextBox3. I renamed it to txtAboutMe. Change the other objects as well. It should look something like this


As you can see the objects have much more explaning names then before they were renamed. The advantages of naming your objects will reflect also if you choose to add an animation to your presentation. When selected your renamed object will also show up as the renamed object in your animation pane.

No more chaos
When creating more complex presentations you'll find this technique very useful. No more chaos in finding out which object to select before finally selecting the right one. Try to make a habit out of naming objects and once you do you won't go back believe me ;-)

Saturday, April 24, 2010

Access: Add a webslice to a webcontrol

In this post i'll show you how to add a webslice to a webcontrol in Access 2010. I got the idea watching the video from Albert Kallal. He created a webdatabase called "Room Bookers". You can view a demo here: http://www.members.shaw.ca/MrTurtle/2010d1/w1.html

Now one of the features i liked was the fact that he imlpemented a webcontrol showing the weather in a certain place. That's what i wanted to try. So here we go.

Add the webcontrol to the form
First create an empty db with one form. On this form add a webcontrol which you can find in the ribbon under controls:


After you click the webcontrol on the form you'll be prompted to enter the hyperlink or webaddress. In this case i added the webaddress from Bing. The webcontrol got filled with the complete website and that's not what i wanted. I just wanted the little piece showing me the weather. So how did Albert do this? I took a second look and paused his video right at the point where he showed the weather part. Now i see it! He's using a webslice instead of a whole website. Ok so it's of to the webslice creater.

Create a webslice
Now how do you create a webslice? First it's of to Internet Explorer. Then I searched with Bing for weather and got several results. The first on is the most interesting because it has a special feature.

When you hover your mouse over the first part of the website a little green box appears around a square block which appears around the first feature on the site. Great this is what's called a webslice! So go ahead and create a webslice from this bly clicking on that green icon on the upper left corner. You'll see the following dialog appear:


Now for ease of use i added it to the favorites bar.. so i can check if it's really there.


and it is! Now all i have to do is copy the url from this webslice and paste in into my own webcontrol used in the database.

As you can see I added the webslice address to the address of the [Insert Hyperlink] dialog and clicked OK. Now let's see if this worked on my form.


and it did, wow this is a great feature! I removed the borders to give it a nice looking effect otherwise you will see those scrollbars etc. So i set the scrollbars to [No].

What No Issues?
I wish i could say that i had no issues but i did. The webslice frequent loses it's connection appearently because i've also seen the following image as well: it's in Dutch but it states:
[This function is temporarily not available. Try again later]

Yes, we have to stay honest here it's no always sunny but we have to give this technique a change. I'll look into the web for other nice webslices i can find and post them back here. If you have or know about any cool webslices let me know.


Sunday, April 18, 2010

Access: Access Web Database To Issue Or Not

Well today i went ahead with eperimenting on the Web Database features of Access 2010. I'm very excited about this feature in Access. I've read a lot about it and Alan Cossey has been experimenting a lot with it since it became available. His comments, questions and blogpost help me a lot in understanding what's going on in the process of creating a web database. You can find his blog here: http://premierdatatech.spaces.live.com/

I actually stared a couple of weeks a go with a simple table and two forms and published this to the sharepoint site. All went well and i was thinking it's about time i took it a step further. So based on the next scenario i'll describe the issues i ran into.

Old database
For starters i created a new 2010 db. Clean as a whistle. I then imported all objects from an old database i created back in 2002 (don't want to mess with productiondata do we now?). Import went fine and i took the glove and put on my user face to publish this database to sharepoint. I hear you thinking 'glove' 'userface' what's he talking about? Well i decided to go about it as a first time 2010 user who hasn't read about Web Databases and just went ahead to see what happens. Well this happened.

Web Compatibility checker
This is actually a great feature build into Access 2010. It checks to see if your table objects are web compatible. Well how do you know what's compatible or not. Just give it a try...
I did a little testing before so i knew that i would be better to check the tables separately. So right click the table and choose [Check Web Compatibility]. After a few seconds i receive the following messagebox:

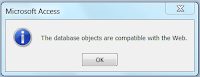
This is great this means this table is perfect. On to the next table. Next one same story, next one same story. Great i'm doing fine i'll be up and running in no time.
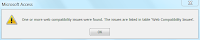
But wait the next table isn't all that perfect according to the next messagebox i see appearing. Wait it's telling me i should look in the table Web Compatibility Issues. So let's do that:

Lookup tables and relationships
The table is filled with fields telling me my datatypes are wrong, the lookup table isn't correct and that a subdatasheetname should be set to [auto] and defaultvalues aren't allowed and should be set to empty. Wow that's a lot of info to swallow. So put down the coffee and start repairing this table...

In the original db i had a relationship build in the relationshipwindow between two tables. One data-entry table which pulls data from a static table with a few options in it. In the form i created a combo and set the value there. In this table a had a reference to a table set via a combo. It referred straight to the table and the first column in it. This works in your regular client db (although it's not done to do so as you all might know). For the webdatabase you create as select statement for the lookup or you use the lookup wizard from the datatype combo which will guide you through the process. After doing so i ran the checker again. Great this works and the table Web Compatibilities actually decreases with one record. So basically if you fix all the problems your webtable should be empty when the table is perfect.

A lot of issues
I didn't understand the fact that you couldn't set a default value. Well let's fix this and remove the defaultvalue from the table. Remember that when creating a number field in your db (client) it sets a defaultvalue of 0 by default. Realizing this i knew i had a lot of defaultvalues to clear in various tables. Another pointer which i ran into is the format of the date time fields. I had them formatted as "dd-mm-yyyy" a format regulary used in my country (Netherlands). Webdatabases have issues with a format set so i had to remove those as well. Ouch i had a lot of fields set with various formats, i was in for quit some fixing. Short time? No not accepted, long time however is accepted. Formatted numberfields for VAT etc. all had to be fixed.

Finally let's publish to sharepoint
After a couple of hours fixing things, trying to understand why some things had to be fixed and rethinking logic i was ready for some publishing. All tables were webcompatible so nothing could stop me now!
wrong...

Yep a huge dialog showed up telling me it wasn't ready for me yet. Ok let's read this and try to figure out what went wrong. The dialog is telling me that info regarding the errors can be found in the table [Sharepoint issues]. Clear, great that i'm being told where i go wrong. So let's have it tell me what's wrong.

Data is being checked
While you think it may not be so the fields are actually being checked for data. How do i know? Well this table is telling me it doesn't accept dates entered prior to 1900 or after 8900. I check the table and the only issue i can detect is the fact that one date field is empty. So brute force here let's delete that record. That did the job. I can go ahead and try publish again. Now this is where i ran into a point i don't like very much. Everytime the publish action encounters problems it will start all over again. That's not a problem and i can live with that. No the point i'm talking about is closing the sharepoint issuetable. When i tried to close this table i had the following messagebox presented:

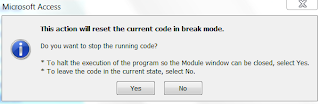
And let me tell you i got this very often. Only way i could get the table closed was going to designview and then close the table. Hmm takes up a lot of extra handling along the way. Now explain to me what's the current code being run in the background? Well let's carry on. All tables are fixed all fields are filled as they should be (no nulls allowed so be prepared for that in some cases!)

Publish succeeded!
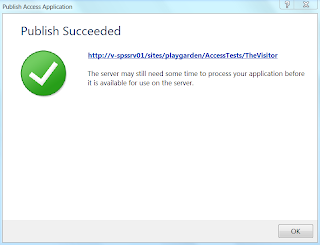
Yes I did it. It published well at least according to this nice big dialog i'm staring at:
So it's of to sharepoint to see if my webdatabase is actually there. As you would have guessed it's there and all the objects are listed. Hmm why am i not seeing a database? Right all the forms i'm looking at are clientforms and those will not work in webdatabases. So it's of to the drawingboard again to create some forms.

Navigation form
This is really a great feature and should be a nice replacement for the switchboard in future db's. I add a navigation form and to that i add two regular forms which i just drag to the navigationform. Easy as that. Now to make sure Sharepoint understands this i set the Startupform in the client to the navigation form (Options - settings - current database). Let's synch this once more and see if i get some output now. YES it's there my navigationform with two additional forms to show for.

One final issue
Now one final issue i ran into popped up a question. My very first webdatabase i published had a regular navigationform with one subform based on one table, worked like a charm. Now this one also has a navigationform with two subforms and the results are what you expect to be. However i see up and down arrows besides every textbox on my form. So i thought well the scrollbars are set to yes and tried to adjust that in design. Strange thing is that the scrollbars aren't set to yes and keyfield behaviour is set to default (not to next line in box). So this issue had me startled? Anyone knows how this might hapen and wat i can do about it. I just created two webdatabases so i haven't got much reference material.

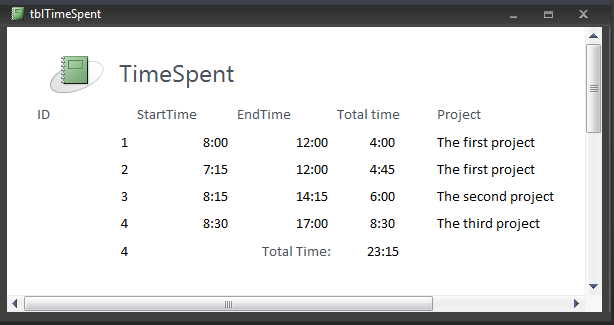
here's how it looks (partially because of the sensitive data it's cropped) but every textbox looks like this.
scrollbars with every textbox? what's this for setting...

What's next
So after this experiment it's time to take it to the next level. A real webdatabase which you can actually use and which has restrictions build in. That means i have to get started on this other new feature the data macros. As a old school kind a guy i was taught that you don't use macro's and go straight into VBA. Well the webdatabase doesn't allow you to use VBA so you have to use the macros. That's where a new world opens for me and it will take an effort or two befor i get it right but i'll give it a shot and let you know in the next blogpost.


Saturday, April 10, 2010

Access: About Report selections and adding time

I decided to blog this post after a question from Stojan in the Access forum. Sometimes it's difficult to explain something in a thread in a forum/newsgroup. You always have the change of ending up in a very long thread explaining things you mean to tell. So after Stojan posted his question i told him i would blog about it. So here we go; opening reports based on parameters and 'summing' time in a report.

Choosing the right report and setting it's parameters
Very often the final output of the database ends up in a report. Wouldn't it be nice to present the user with some kind of form where he can choose the report he wants to see and set the parameters he wants to use. Over time i noticed i had to find a way to present the user with a choice and make it maintainable for the developer. So I came up with the idea of using a listbox in combination with comboboxes where you can set the parameters. It's nothing fancy and a lot of people will use a similar technique. Here's how it works.

Report table
First i created a reporttable in which i store all my reportnames. The first field is the actual reportname you give the reportobject in your database. The second field i added i use for a description for the report. This table is used as a source for the listbox i created on the form. The first column is set to zero width (0) and is the bound column. The second column (description) is what i will show to the user.


Now you have to add some other controls to the form which make it possible for the user to perform the various actions.
Start by placing the various comboboxes on the form. After that place a close button and a print preview button on the form. The basic idea will be that the user clicks a report on the left from the listbox. Based on the selected report the various comboboxes will be enabled or disabled. When the parameters are set the user can click print preview and the report will be shown.


I'm an old school kind a guy and learned not to use macro's other then for a startup action so i added some code behind the form in VBA. Remember i always try to keep everything as simple as possible so the code i write behind the form is very straight and very simple.

Which report is selected
The first piece of code i've written is to see which report is selected and which comboboxes should be enabled. You can see the actual code in the sample database i provided. But basically it comes down to this:

I declare a variable "strReport". Next i add the value of the listbox by setting it as follows:
strReport=me.lstReportChoice
Because the first column is set to zero width but it is the bound column the variable will be filled with the actual report name. Knowing the actual reportname you can now set the various comboboxes to enabled or not. That's the process you have to decide because som of them need to be enabled and others not.

Open the report based on the parameters
Ofcourse the reports that need to be opened should be created first. If you make it very dynamic you can create one report based on a query. In the query you can set the various parameters for the form. If no parameters are set the query will show all records otherwise it will use the set parameters.
So for instance say you have two parameters set e.g. Department and Employee.
In your query you can set the employee criteria to: forms!frmReport!cboEmployee. In this case it will only give output if an option is chosen and otherwise it will show nothing. So by adding just a little more information we can tackle this: like (forms!frmReport!cboEmployee) & "*" This way when no selection is made from the combobox all records will be shown. You can set a similar criteria for the department field in that same query.

Users like output
How strange it may seem the user always expects ouput no matter what. So if he forgets to set a parameter he still expects ouput. Based on that knowledge it's better to show all records instead of none at all. If a user gets no output at all the mind is going to work asking what he did wrong causing it to get no output. So i got used to showing everything instead of nothing. One exception though; if you have thousands of records to show it might be better to present the user with a messagebox stating that he forgot to make a selection instead of presenting him with thousands of records of information.

Summing time
The second part of the question Stojan had was about summing time. He had two fields (well actualy three) in which he entered time namely "Start Time", "End Time" and "Total Time". As you should know the field "Total" indicates that a calculation has to be made. Calculations should not be stored in your tables but be comrpomised fields in queries or reports. So answer the question for Stojan I added two fields one in his form and one is his report.


The only thing you have to adjust is setting the sourcecontrol to the following: =StartTime - 1 - EndTime
Furthermore i've set the fields to Date time (short time format). And that gave the desired output Stojan was looking for.

Ive added a sample database with this post so you can see the reportform an adding time option.
you can find it here:


Saturday, April 03, 2010

Access: Runtime version and Trusted Locations

So I was working on this project and bumped into the following situation. Client needed a Runtime version of an Access app. No problem we downloaded the Developer Extensions (which can be found here: http://www.microsoft.com/downloads/details.aspx?FamilyId=D96A8358-ECE4-4BEE-A844-F81856DCEB67&displaylang=en ) and installed that. After that we downloaded the Access Runtime engine (which can be found here: http://www.microsoft.com/downloads/details.aspx?familyid=D9AE78D9-9DC6-4B38-9FA6-2C745A175AED&displaylang=en ) and went ahead and packaged the accdb. This all went fine.

Installation on the client pc
After installation on the client pc we bumped into some various issues which i think can be important to know for when you are confronted with this situation. The installation on the client pc using the setup from the packaged file went fine. We started the app and the very first message we saw was a security message. This message isn't al together clear but after investigation it a bit further i knew this had something to do with the trusted location settings. Ofcourse... during development we had set the trusted location to point x and that gave no issues. But when distributing you will run into this issue because you can't set anything anymore once you've created a runtime. So how to go about this situation. We thought of a couple of options we could do:

  • Add the trusted location to the original accdb settings when packaging... no that would not make a difference because it's a user based situation. Besides we wouldn't know where the installation would take place;
  • Try to figure out how access treats Trusted locations and try to modify those settings.
Registry settings (be careful!!)
We chose the latter one and took the plunge into the registry. Now remember that messing with the registry can mess up your computer, so unless you know what you are doing leave it alone and let someone who knows what he's doing help you with making the necessary adjustments.

Every trusted location you add to the Trusted Locations in the Trustcenter Settings from within Access is written to the registry. When adding the runtime engine to a certain client pc a set of keys will be created. By adjusting those settings you can set a specific path as an additional trusted location.

Keys
These are the keys you have to add to the trusted locations. As stated earlier, if you are not familiar with the registry don't touch it and ask for help from someone who knows this stuff!

The Key you have to add is the following:
[HKEY_CURRENT_USER\Software\Microsoft\Office\12.0\Access\Security\Trusted Locations\Location1
AllowSubFolders (REG_DWORD) = 1
Path (REG_SZ) "c:\thepathtoyourdatabasefolder"

Explanation
The first line you see is the treestructure you have to follow to get to the designated registry key
The second line is the key you have to add to the settings the 1 indicates that the subfolders should be also allowed as trusted.
The third line is the line where you add the path (don't forget the double quotes here..) to the trusted location to be added. This example set's it to c:\blablabla but this can be antoher driveletter altogether..

Now every loaction added from within Access will create an addition location number. It might be that you alreade have Location1, Location2 etc. In that case you have to add another Location(x) to make sure you don't alter anything existing

Next step
After adding the registry key we started the application again and the security warning disappeared. Yep this worked. Next we were confronted with an additional warning - error 2950. As usual this can mean a lot. In our specific case we are trying to run code when the app starts (initialize routine which checks the linked tables). At that point we were presented with the dialog that all macro's are halted and there you are knowing not wat to do. What causes this.

Diving into the registry again. Setting the sandbox option to something different? That's one of the suggestion we could do but in my opinion that wouldn't make a change here because i didn't want to work in sandbox mode.

Finding the solution to this problem
I didn't find a solution yest for this problem but we are working on it. I'm going to eliminate the variables to see what might cause this issue. Meanwhile i've posted a question on the Technet Access forum (which you can find here: http://social.technet.microsoft.com/Forums/en-US/access/threads ) so other developers can think with me on this one. I'll keep you posted on this one.

Conclusion...
In the early days the enable macro options was one of the features you had to worry about. Now you have a lot of other issues you have to consider when distributing the app. Keeps you sharp ;-)

Thursday, April 01, 2010

Access: Returning Filtered Data on Form

I like spending time in the Access newsgroups. Trying to help people out finding a solution for a problem they are struggling with. Sam asked a question about a search option in a form header and showing the results of the query to the detailsection of the form. After a couple of posts we are almost there. But sometimes it's better to show the image. So this post is for Sam explaining what we are talking about in the thread of the newsgroup. So here we go Sam.

Images (click to enlarge...)
I'll add several images for clarity here and try to explain what the goal should be. Remember Sam that you have to tune this to your own situation because I don't have your data...

I've based the example on a single simple table called Customers:

Now it's time to take the next step: create the query: "qGenerics". In your sample you can run the sql which you have create in your VBA. This will add the SQL statement to the query.

When the query is added it's time to create the form and it's functionality you are looking for see the next page. My form is called "form2"

You create the form by using a wizard or create one yourself. I used Access 2003 but the funtionality in 2007 is nearly the same. Use a wizard or create a blank form with the "qGenerics" as recordsource.

The next couple of steps are important they are based on the view you would like:

The images should be followed top down so after the new form image we take the next step: you have to set the recordset. If done by the wizard this is taken care of for you. When you don't use the wizard you'll have to chose it yourself.

The fieldlist will show up next to the design of the form. Add a formheader and a formfooter to the form. Drag the fields to the detailsection of the form. Rearrange them the way you like. I often use the tabular layout which is pretty familiar with most people.

As you can see i added a form header and a for footer. I've taken the labels and added them to the form header. When you set your form to "continuous" this will prevent the labels being showed with every record. After that i've narrowed the detail section to the smalles
possible size. The records will be shown as a list so we can save the space and the records will be show tightly under one another.


Now set the form to "continuous" in the form properties.
Add a search text box to the header of the form (regular textbox).
When the textbox is added set an event to the afterupdate event. In VBA add the following code: see next pincture.

The VBA code is fairly straight forward. I set the DB to the currentdb. set the strSQL to be a regular select statement. For conveniance i added an if statement to check something has been typed in the searchbox. If not then all the records will be displayed. If something is typed in the strSQL is adapted accordingly.

I remove the recordsource by setting it to "" and the resetting it by the newly filled "qGeneric". Because this action will paint the form i set the application echo to false, perform the action and set the application echo to true again. This prevents the painting of the form and will show the filtered set directly. Which reminded me that you can achieve the same result by just using a filter. I've added a double click event to the search text box. This will trigger the filter which i set based on the parameter entered in the searchbox. In this case it's the 'city' parameter.

Now let's see the results:
When the textbox is empty and the user doubleclicks on the searchbox all the records will be shown. If something is typed in the searchbox and enter is pressed the recordset will be adapted and shown accordingly. Remember you have to add some nice errorhandling to top things of after all we are dealing with users and you'll never know what a user is up to ;-)

Final result

before and after the search has been set..


Sample database can be found here:


Monday, March 29, 2010

OneNote: Create Your Own Template in OneNote

When I started using OneNote i quickly felt the need of creating my own OneNote book template. It was hard to find how you actually have to do this so i decided to describe the steps in this article.
Sure enough you can make quick templates but often that resembles the current section you are using. What i mean is that we want to create a whole onenote book as designed by the user. So here we go.

Creating the OneNote Book and Saving it as a Template
1. Create your own OneNote book just the way you like it. Remember that it has to become a template so create pages where you describe what to expect from the user. Create sections add everything you need.
2. For my sample i created a simple book called Blog where i write my blog documents. For every application i have a seperate tab. Simple as can be but the goal here is to show you how you can use it as a template.
3. As you know OneNote saves everything directly so you don't have to save anything. Well in this case you do have to make a seperate save to create a template from your OneNote book. So goto the [SaveAs] option and here is where you have to make two seperate choices before you click save.
4. In the combobox [Save as type] choose the option: OneNote Single File Package (*.onepkg)


5. Next choose the third radiobutton which states "current notebook"


The last option is important because otherwise the current section is saved as a template and we want the whole book.

Placing the template in the correct directory
When the template is saved it's important to save it in the correct location so it will show up in the dialog when you create a new OneNote Book. To do this save the  .onepkg file in the following directory:

\Program Files\Microsoft Office\Templates\1033\ONENOTE\12\Notebook Templates

if saved in this directory you template will show up in the create new book dialog as follows:


see that the newly added "Blog" template is accessible

Remarks:

1. If you have a 64 bit Windows installed with a 32bits Office you may have to look here...
\Program Files (x86)\Microsoft Office\Templates\1033\ONENOTE\12\Notebook Templates
2. If you have another language installed you may have to look in another folder so change it accordingly: (the blue section might be another number for your specific language...)
\Program Files\Microsoft Office\Templates\1033\ONENOTE\12\Notebook Templates

Now when you have created a template and you want to share with the world upload it on Microsoft Online. If you just want to share it with your colleagues then distribute the appropriate way so it will end up in their 'new' dialog. Remember you did the hard work, all they have to do is use it ;-)